Setup and Configuration
This page describes the steps to configure proed4w. Don't let the amount of text on this page scare you: it really is not much work to get started.
Locate or create a directory in your PROPATH where you like to install tools, for example:
c:\p4gl\tools            (existing directory, already in your PROPATH)
c:\p4gl\tools\proparse   (contains proparse.dll and sources)
c:\p4gl\tools\prolint    (contains prolint sources)
c:\p4gl\tools\proed4w
Unzip the contents of proed4w.zip in directory tools: this will create subdirectories tools\proed4w and tools\adecomm. If all is well then you
should be able to "run proed4w\proed4w.p" without modifying the PROPATH.
Next you will have to customize a couple of configuration files. You can choose to let setup.w take care of all that, or you can choose to do it manually. I suggest you use setup.w first and maybe later optimize some things manually when needed.
Automated configuration, using setup.w:
- Start a Progress session and connect all databases that are required for a typical development session. More precisely: connect all databases that are required when you want Prolint to check your sourcefiles.
- Make sure ED for Windows is not running. Close ED if it is running.
- run proed4w/setup.w.
That's all! You can skip the next paragraph and continue reading "Create a custom toolbar-button in ED for Windows".
Note: You can repeatedly run setup.w, it will never override existing settings except in directory proed4w/settings/setup.
Manual configuration:
If you didn't or couldn't simply run proed4w/setup.w, you can follow these steps instead:
- Add proed4w/winEd4W.w to the PRO*TOOLS palette. A small bitmap is provided in the proed4w directory.
- procedure proed4w/winEd4w.w requires the MessageBlaster OCX. There is a chance that this OCX is already registered on your PC, but if it isn't run the following command (assuming that proed4w was installed in subdirectory c:\p4gl\tools):
regsvr32 c:\p4gl\tools\proed4w\msgblst32.ocx
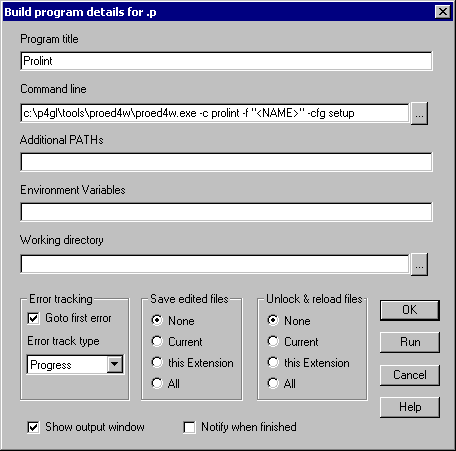
- in ED for Windows, open a .p file, then go to menu-item "Tool|Build setup..." and press the "Add"-button to add a new extension-specific program title. Give the new program a descriptive title like "Prolint". Set the command line to
c:\p4gl\tools\proed4w\proed4w.exe -c prolint -f "<NAME>" -cfg setup
(where c:\p4gl\tools\ needs to be replaced by the actual location on your PC).
A complete overview of parameters is on page "parameters".Set "Error track type" to "Progress" and select "Show output window". You may also want to experiment with the radio-set "Save edited files".
The result will look like this screenshot:
- now open a .w file in ED for Windows and repeat the previous step to add Prolint for this extension too.
- Create yet another one, but this time as a General title (not extension specific). Name it "Prolint-logwin" and the command-line is simply:
c:\p4gl\tools\proed4w\proed4w.exe -c prolint-logwin
- locate subdirectory proed4w/settings/setup. You will find a couple of files: setup.ini, setup.pf and proed4w.ini.
These files need to be customized:- proed4w.ini: modify command and workingdir
- setup.ini: (this is basically a copy of progress/startup.ini): modify at least DLC and PROPATH
- setup.pf: add connection parameters for your development database(s).
Create a custom toolbar-button in ED for Windows:
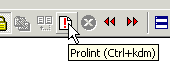
You don't have to create a custom toolbar-button but it makes life helluvalot easier: edit a source file, press the button and Prolint will inspect your modified source.
The steps to create a button can be found in the FAQ at getsoft: click here.